This howto's and many more can be found at:
Wednesday, December 26, 2007
Sunday, September 23, 2007
HOWTO merge or split mp3 files
To merge two or more mp3 you will need to get the program called mp3wrap. To split two files you can use program called mp3splt. You can install them by typing:
sudo apt-get install mp3wrap mp3splt
Now you can merge two mp3 files (let's say 1.mp3 and 2.mp3) by typing:
mp3wrap merged.mp3 2.mp3 1.mp3
note that the merged.mp3 will start with 2.mp3 and finish with 1.mp3
You can split mp3's now by typing:
mp3splt merged.mp3 0.0 1.2 3.4
this will split file merged.mp3 into two parts:
00:00 - 01:02
01:02 - 03:04
where xx:xx represents minutes:seconds.
If you have problems splitting files merged with mp3wrap delete whatever mp3wrap add to filename and then try again. You shouldn't experience any problems now.
To see more info on these commands type
man mp3wrap
or
man mp3splt
HOWTO record audio streams
Recording audio streams, like your favorite online radio, is a simple thing to do. But first you need to know which application to use. I recomend streamripper. To install it simply type:
sudo apt-get install streamripper
Now create folder in which you want to save your recordings:
mkdir ~/streams
Navigate to that folder and type
streamripper http://url.of.the.online.radio
for example
streamripper http://mp3-vr-128.smgradio.com:80/
will get you music/show playing on Virgin Radio.
Also, you can type
streamripper
to see what options you can use. As I told you, it doesn't get any simpler than that. :)
Thursday, September 20, 2007
HOWTO merge pdf (using pdftk)
Firs of all you will need the program called pdftk. You can get it by opening terminal and typing:
sudo apt-get install pdftk
Now you can merge pdf files by putting them in the same directory and typing:
pdftk 1.pdf 2.pdf 3.pdf cat output merged.pdf
or if you wish to merge files in alphabetical order you can simply type:
pdftk *.pdf cat output merged.pdf
Here are some more examples how to use pdftk:
I found these on this link.
sudo apt-get install pdftk
Now you can merge pdf files by putting them in the same directory and typing:
pdftk 1.pdf 2.pdf 3.pdf cat output merged.pdf
or if you wish to merge files in alphabetical order you can simply type:
pdftk *.pdf cat output merged.pdf
Here are some more examples how to use pdftk:
(Using Handles):
pdftk A=1.pdf B=2.pdf cat A B output 12.pdf
Split Select Pages from Multiple PDFs into a New Document
pdftk A=one.pdf B=two.pdf cat A1-7 B1-5 A8 output combined.pdf
Encrypt a PDF using 128-Bit Strength (the Default) and Withhold All Permissions (the Default)
pdftk mydoc.pdf output mydoc.128.pdf owner_pw foopass
Same as Above, Except a Password is Required to Open the PDF
pdftk mydoc.pdf output mydoc.128.pdf owner_pw foo user_pw baz
Same as Above, Except Printing is Allowed (after the PDF is Open)
pdftk mydoc.pdf output mydoc.128.pdf owner_pw foo user_pw baz allow printing
Decrypt a PDF
pdftk secured.pdf input_pw foopass output unsecured.pdf
Join Two Files, One of Which is Encrypted (the Output is Not Encrypted)
pdftk A=secured.pdf mydoc.pdf input_pw A=foopass cat output combined.pdf
Uncompress PDF Page Streams for Editing the PDF Code in a Text Editor
pdftk mydoc.pdf output mydoc.clear.pdf uncompress
Repair a PDF's Corrupted XREF Table and Stream Lengths (If Possible)
pdftk broken.pdf output fixed.pdf
Burst a Single PDF Document into Single Pages and Report its Data to doc_data.txt
pdftk mydoc.pdf burst
Report on PDF Document Metadata, Bookmarks and Page Labels
pdftk mydoc.pdf dump_data output report.txt
I found these on this link.
Saturday, September 15, 2007
HOWTO download mms stream with mplayer
First you will have to download mplayer if you already haven't installed it.
Here you can find how to do that. Don't forget to change the repositories and add multimedia codecs.
UBUNTUGUIDE
Now get the link of the stream. You can get it by clicking on stream with right mouse button and then selecting properties.
Open the terminal and type:
mplayer mms:/link/something.xxx -dumpstream -dumpfile file.xxx
mms:/link/something.xxx - link to the stream you wish to download
file.xxx - file to which you wish to download the stream, be careful to write the same extension xxx
Wait for the file to download and that's it.
Friday, August 10, 2007
HOWTO cut a clip from an avi
Suppose you have a large video, or movie and you want to send your friend just a clip from it. Well you will need to cut that clip out of the movie. First, find out at which time time starts the clip you wish to cut. Next, find out how long does it last.
For example, the clip starts at 00:51:42 (hours:minutes:seconds) and ends at 00:55:12. So the duration of the clip is 00:03:30.
Now open terminal and type:
sudo apt-get install ffdshow
This will install the necessary software. Navigate to the folder where your movie/clip is located and type:
ffdshow -i movie.avi -ss 00:51:42 -t 00:03:30 clip.avi
This will get you the desired clip. Now let me explain you the commands in short:
-i movie.avi - this is the input file
-ss hh:mm:ss - this is the time at which the extracted clip starts
-t hh:mm:ss - this is the duration of the clip
clip.avi - this is the output file
In case the clip size is still to large you can also use ffdshow to reduce its size.
Click here to see how.
Friday, August 3, 2007
HOWTO moutn bin/cue, iso, mds, ccd and nrg files (Feisty)
Before we start I'd like to be sure you know how to mount regular ISO files. Use terminal to navigate to the folder containing your ISO image and type:
I'm sure you have many times downloaded a CD/DVD image that wasn't standard iso file. The problem with these ones is that you cannot mount them in Ubuntu. There are many bin2iso and similar converter programs but theres a simple way to get these images mounted. It's called cdemu.
Before you continue be aware. If you have download bin/cue image that should contain a video it is possible that it's a svcd image and if this is the case mplayer can natively read this files. Just type
mplayer image.bin
and it should work.
Also, with VLC player you can play iso files. To install vlc type:
sudo apt-get install vlc
If this is not the case download latest cdemu from here. Extract it and navigate to the extracted folder. Feisty users should type:
nano cdemu_core.c
and replace the generic_file_read with do_sync_read. It should be done in two lines as shown on images below.


Now type:
make
sudo make install
sudo gedit /usr/bin/create_cdemu_devs.sh
and replace everything with following:
Next type:
sudo nano /etc/rc.local
and before exit 0 you add following:
Type:
sudo modprobe loop
sudo create_cdemu_devs.sh
And thats it. To mount bin/cue image type:
cdemu X image.cue
mkdir /media/cdemuX
sudo mount -t iso9660 -o -ro /dec/cdemu/X /media/cdemuX
Where X is any integral number between 0 and 7 (X=0,1,2,3,...,7). This is because u get 8 virtual CD-ROMs so you can mount 8 images at the same time.
To unmount image type:
cdemu -u X
where X is the number of drive you wish to unmount.
You can find more tips on configuring your cdemu here. Steps 7. and successive.
sudo mkdir /media/virtual
sudo modprobe loop
sudo mount image.iso /media/virtual -o loop
Now let's proceed.I'm sure you have many times downloaded a CD/DVD image that wasn't standard iso file. The problem with these ones is that you cannot mount them in Ubuntu. There are many bin2iso and similar converter programs but theres a simple way to get these images mounted. It's called cdemu.
Before you continue be aware. If you have download bin/cue image that should contain a video it is possible that it's a svcd image and if this is the case mplayer can natively read this files. Just type
mplayer image.bin
and it should work.
Also, with VLC player you can play iso files. To install vlc type:
sudo apt-get install vlc
If this is not the case download latest cdemu from here. Extract it and navigate to the extracted folder. Feisty users should type:
nano cdemu_core.c
and replace the generic_file_read with do_sync_read. It should be done in two lines as shown on images below.


Now type:
make
sudo make install
sudo gedit /usr/bin/create_cdemu_devs.sh
and replace everything with following:
#!/bin/bash

#if [ -e /dev/.devfs ] ; then
# echo "You have devfs, nodes will be created automagically"
# exit 0
#fi
#if [ -e /dev/.udev ] || [ -e /dev/.udev.tdb ] ; then
# echo "You have udev, nodes will be created automagically"
# exit 0
#fi
#if [ ! -z "${DESTDIR}" ] ; then
# echo "Creating a package, nodes should be created later"
# exit 0
#fi

# find out cdemu device major number
if [ ! -r /proc/devices ]; then
echo "Can't open /proc/devices, make sure /proc is mounted"
exit 0
fi

modprobe cdemu
if [ -z "$(lsmod | grep ^cdemu)" ]; then
echo "Can't load module"
exit 0
fi
cdemumajor=$(grep "^[[:space:]]*[0-9]\+[[:space:]]\+cdemu$" /proc/devices | grep -o "[0-9]\+")
if [ -z "$cdemumajor" ]; then
echo "Can't find cdemu device number in /proc/devices"
exit 0
fi
#modprobe -r cdemu
#

if [ -e /dev/cdemu ]; then
rm -rf /dev/cdemu
fi
if [ -b /dev/cdemu0 ]; then
rm -f /dev/cdemu*
fi
mkdir /dev/cdemu
for drivenumber in `seq -w 0 7` ; do
mknod /dev/cdemu/${drivenumber} b ${cdemumajor} ${drivenumber}
done

#echo "if no error did show up device files created ;-)"
Next type:
sudo nano /etc/rc.local
and before exit 0 you add following:
echo " Creating CDemu devices..."
create_cdemu_devs.sh
Type:
sudo modprobe loop
sudo create_cdemu_devs.sh
And thats it. To mount bin/cue image type:
cdemu X image.cue
mkdir /media/cdemuX
sudo mount -t iso9660 -o -ro /dec/cdemu/X /media/cdemuX
Where X is any integral number between 0 and 7 (X=0,1,2,3,...,7). This is because u get 8 virtual CD-ROMs so you can mount 8 images at the same time.
To unmount image type:
cdemu -u X
where X is the number of drive you wish to unmount.
You can find more tips on configuring your cdemu here. Steps 7. and successive.
Tuesday, July 10, 2007
HOWTO use google side by side with your p2p client
Sometimes its impossible to find something on peer to peer networks. Here's a different method you can use side by side with your p2p program or torrents. I will use Firefox because I like it but I think there is no difference if you use some other web browser. The method will work the same in Windows or Linux or any other OS that can reach Google.
So open Google and type in search bar:
intitle:"index.of"
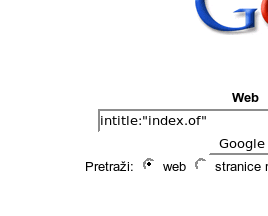
This searches for words index and of in a certain web page. This is usually found when there are only files inside of directory and no html or php index page .
Type /home if in Linux or c:/ if in Windows in your browsers address bar to see what I'm talking about.
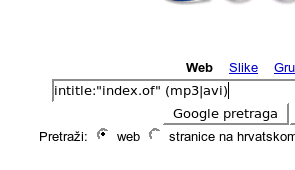
By now you might see to where we are heading. Next add to the search bar (mp3|avi). This will search for the files that have mp3 or avi in them. This by now should look something like this
Now type the name of the song that you want to find but type it with periods between the words instead of spaces. For example fluorescent.adolescent:
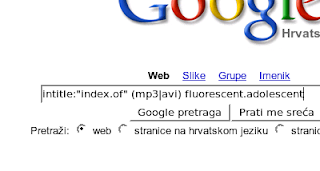
This way you will not be limited to spaces but also dashes, dots and some other symbols that might be used.
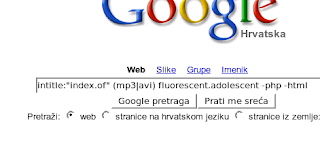
Thats pretty much it. I'm not going to post pictures of what came out because I don't want to get anyone in trouble but feel free to try this method and convince yourself it works. You can also remove some results which you don't want to be found. Like anything that has php or html in itself by adding -php or -html in your search bar. This way you can reduce the amount of spam that comes out.
Enjoy the Google.
But beware, DO NOT download anything that is not allowed to be distributed by the author himself/herself. That is ILLEGAL. Use it only to download free music that is hard to find on p2p networks.
src="http://pagead2.googlesyndication.com/pagead/show_ads.js">
So open Google and type in search bar:
intitle:"index.of"

This searches for words index and of in a certain web page. This is usually found when there are only files inside of directory and no html or php index page .
Type /home if in Linux or c:/ if in Windows in your browsers address bar to see what I'm talking about.
By now you might see to where we are heading. Next add to the search bar (mp3|avi). This will search for the files that have mp3 or avi in them. This by now should look something like this

Now type the name of the song that you want to find but type it with periods between the words instead of spaces. For example fluorescent.adolescent:

This way you will not be limited to spaces but also dashes, dots and some other symbols that might be used.
Thats pretty much it. I'm not going to post pictures of what came out because I don't want to get anyone in trouble but feel free to try this method and convince yourself it works. You can also remove some results which you don't want to be found. Like anything that has php or html in itself by adding -php or -html in your search bar. This way you can reduce the amount of spam that comes out.

Enjoy the Google.
But beware, DO NOT download anything that is not allowed to be distributed by the author himself/herself. That is ILLEGAL. Use it only to download free music that is hard to find on p2p networks.
src="http://pagead2.googlesyndication.com/pagead/show_ads.js">
Sunday, July 8, 2007
HOWTO resize whole folder of images in a few seconds
So,
you want to resize a folder full of images but don't have neither time or will to do it picture by picture with your favorite picture editing program. There is a simpler way. Much simpler way. So simple you will not believe. :) OK let's start. First you will need imagemagick program. Open terminal and type:
sudo apt-get install imagemagick
Install it and then navigate to the folder where the pictures you wish to resize are located. Type:
mkdir resized
This will create subfolder called resized in that directory. This is where your resized pictures will be located. Now type:
convert -size 640x480 *.jpg ./resized/small.jpg
Wait for a while until program finishes and thats it. Now take a look what have you done:
convert - name of the program
-size 640x480 - size to which images will be resized
*.jpg - input pictures, it tells program to convert all pictures in this folder that end with .jpg
./resized/small.jpg - tells program to save the resized images to folder resized which is located in folder (thats why theres dot in front) in which you currently are, images are saved as small-1.jpg, small-2.jpg, and so on
Thats all. Your resized images are located in folder resized.
HOWTO create additional Firefox profiles
Let's say you wish to have several different Firefox settings. Reasons may vary and I don't want to get into this but I found this feature extremely useful so I decided to make this simple howto.
First open terminal and type:
firefox -ProfileManager
Window will pop out and you will see your Default profile and button which says Create Profile. Click on it and then on Next. Now enter the name you wish to use for this profile and location where it will be located. For most cases it's OK to leave the default location. Click on Finish. Remember the name of your new profile (I'll call it extraprofile, so wherever I say to write extraprofile you type name you gave to profile you just created), select Default profile and start Firefox. Your old profile will open and if you don't want to use Firefox at this time you can close it.
Now go to the top of your screen, or bottom, wherever your launch icons are situated and right click next to one of them. Next click on Add to panel. Then click on Custom Application Launcher. Name it firefox extraprofile and in command field type
firefox -P extraprofile
You can add comment if you wish or an icon so you can differ profiles one from another. Here are some non-default icons of Firefox I found so you don't have to.
HOWTO set Windows as default boot menu choice after installing Ubuntu
You heard about Ubuntu Linux and wanted to give it a try. So you installed it but since you are still not used to it you use Windows much more than Linux. The problem is that grub set the Ubuntu as first boot selection so if you wish to boot to Windows when powering on your computer you need to wait for a boot menu to show up and then select Windows from it. Very annoying, I know. So what to do?
When boot menu opens remember in which row the Windows menu was. Count every row including the one which says "Other operating systems:" and count it in a way that first row is zero, second one, third two and so on. Remember in which row was Windows. (Keep in mind that if it was the 5th row remember 4.)
Now boot to Ubuntu, open terminal and type:
sudo nano /boot/grub/menu.lst
In roughly tenth row there will be written:
default 0
replace the number 0 with the number of row in which windows were. (Again keep in mind that if it was in 5th row type 4.)
Save by pressing ctrl+o and enter and exit by pressing ctrl+x.
Reboot the computer and after the timeout finishes your computer will boot to Windows os.
Also if you wish you can change the timeout time by replacing timeout 10 in "/etc/grub/menu.lst" with timeout x where x is custom timeout in seconds.
If there is no default 0 or timeout 10 row in your /boot/grub/menu.lst you can simply add it yourself.
HOWTO shrink movies from your digital camera (Canon A610)
I think you have already noticed that the size of the movies recorded with your camera is a bit to large. So a normal thing to think is how to reduce the size of these movies with as little loss in quality as possible.
First,
you need to install the ffmpg. You do this as simple as this. Open terminal and type:
sudo apt-get install ffmpeg
Now navigate in terminal to the folder where your movie is located (let's say its called movie.avi) and type:
ffmpeg -i movie.avi -ab 56 -ar 22050 -b 500 -r 20 -s 640x480 movie1.avi
This will give you a movie named movie1.avi with one tenth of original movie size and no noticable loss in quality.
Let me explain the command for you so you can modify it yourself.
ffmpeg - starts the program
-i movie.avi - this is the input file
-ab 56 - sets audio bitrate of the output file, in kbit/s
-ar 22050 - sets audio sampling rate of the output file, in Hz
-r - sets frame rate of the output file, in Hz (this value will effect the final size the most, so play with it to get the best result for yourself)
-s - sets resolution of the output file
movie1.avi - name of the output file
That's it. If you have some problems you're free to post it in comments.
Thursday, July 5, 2007
HOWTO convert daa image to iso
So,
you got yourself an important dvd image that is in (poweriso) daa format and you can't neither burn it or mount it on your hard drive. Since this is powerisos format you'll need the poweriso to convert it to ordinary *.iso file.
First,
go to the Poweriso download section. Lucky for you linux version is free and you can download it from the page above. Now that you got it extract it and navigate with terminal to that folder. If your image is located in for example
/home/user/images/myimage.daa
you can convert it as this. I hope you have already navigated with terminal to location of power iso, if not do so. Now type:
./poweriso convert /home/user/images/myimage.daa -o /home/user/images/myimage.iso -ot iso
And thats it. Now you can mount that image to any folder you wish (for example /media/virtual/) by typing:
sudo modprobe loop
sudo mount /home/user/images/myimage.iso /media/virtual/ -t iso9660 -o loop
Or you can simply burn it by right clicking on its icon and selecting Write to Disc...
HOWTO replace ati with nvidia graphic card on ubuntu 7.04
Ok,
so you bought yourself a brand new Nvidia graphics card to replace your old ati card that gave you hell of problems or was just out of date. You pull your old card out of computer and put in the new one. Start the computer and TADA. Xorg error. You got the wrong drivers.
So,
what to do. Say yes to all errors. You don't need to see logs or anything. Just get to the point you can log into your ubuntu machine via shell. Log in. Now type:
sudo cp /etc/X11/xorg.conf /etc/X11/xorg.conf_oldati
With this you will save configuration of your monitor, mouse, keybord and maybe some other things.
Now type:
sudo apt-get install nvidia-glx nvidia-settings
With this you will install necessary drives and graphic menu for your new card. Now type:
sudo nano /etc/X11/xorg.conf
It should open xorg.conf file. Find the part where it says (you can find it by pressing ctrl+w and type ati ) :
Driver "ati"
and replace it with
Driver "nvidia"
Save the file by pressing ctrl+o and enter twice. Save the new xorg.conf by typing:
sudo cp /etc/X11/xorg.conf /etc/X11/xorg.conf_oldnvidia
Now reboot your computer and everything should be fine. If it's still not working log into the shell again and type:
sudo dpkg-reconfigure xserver-xorg
Reed what it say and if you don't know what to do better leave everything at default. After finishing type:
sudo cp /etc/X11/xorg.conf_oldnvidia /etc/X11/xorg.conf
Reboot and TADA. It works. C'est ca. Enjoy.
ps.
You can change the settings of your new card by opening terminal and writing
sudo nvidia-settings
Subscribe to:
Posts (Atom)
